STIRRED TANK REACTOR PROTOTYPE
This project explores a small stirred tank reactor setup built around a 750 mL flask, with active mixing, basic temperature control, and automated pumping and heating control. It is designed as a practical platform for running repeatable mixing and flow routines, and for testing simple process control ideas on a benchtop scale.

Why make it?
A lot of small-scale chemistry and fermentation work comes down to the same few needs: consistent agitation, controlled temperature, and a reliable way to add or remove liquid without constantly handling the vessel. In practice, it is easy to mix by hand and heat with a hot plate, but it becomes harder to repeat the same conditions across runs, especially once you introduce timed additions, draining, or longer hold periods. I wanted a compact setup that could stir, heat, and move liquid in and out in a controlled way, using parts that are accessible and easy to iterate on.
How it's Made
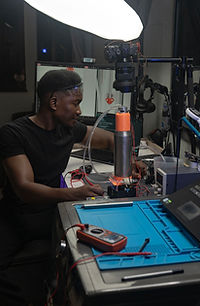
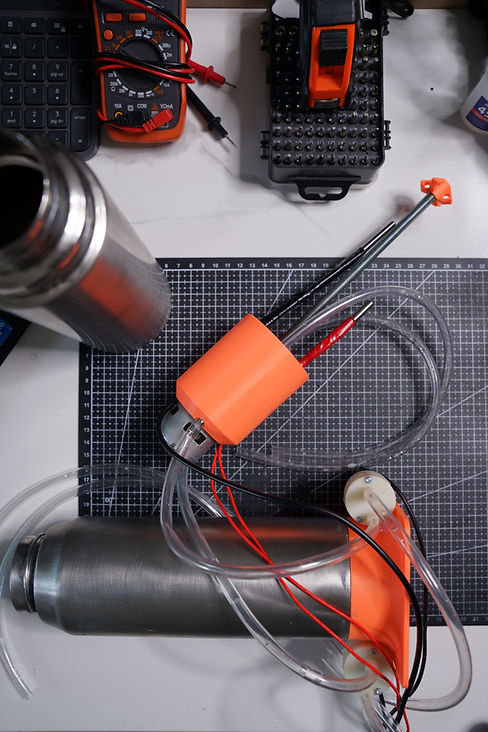
The reactor is built with a 3D printed shroud that sits on a 750 mL flask. The shroud holds a 775 DC motor, coupled to an 8 mm shaft (threaded rod in this build) that drives an impeller inside the flask. A simple gasket seal sits around the shaft to reduce splashing and protect the motor.
The shroud includes four ports. Two are used for tubing connected to two pumps, which lets the system run as inlet and outlet, or as two inlets, or two outlets depending on the experiment. The other two ports are for a 12 V cartridge heater and a probe-style temperature sensor. The tubing is clear, mainly so flow is easy to see during testing.
Control is handled by an ESP32 over Wi-Fi using a dashboard interface. From the dashboard, both pumps can be driven forward or reverse, pump speed can be adjusted, mixing can be switched on and off, and heating can be controlled using simple on off temperature control with an adjustable tolerance band. The overall effect is that you can run timed sequences such as fill for a set time, mix for a set time, then drain, or set up a recycle style routine.
Key Focus
-
Implement basic temperature measurement and heater control with a setpoint and adjustable tolerance band
- Build a small stirred tank reactor with reliable agitation using a 775 motor and shaft driven impeller
-
Add controlled pump in and pump out capability using two reversible pumps
-
Create a dashboard interface to run manual control and timed automated sequences
-
Identify practical limitations that affect repeatability, especially sealing, pressure behaviour, and materials
Problems Experienced
Sealing and pressure behaviour
Once the shroud was sealed well, the flask could develop a vacuum during draining. When one pump was pulling liquid out strongly, it could start influencing the other line because the system was trying to equalise pressure. In some cases, this showed up as unexpected flow in the other tube. The immediate workaround was leaving a small air gap in the flask and being deliberate about which pump runs when. The proper fix is adding a pressure relief path, either a simple vent or a controlled venting method that does not compromise the seal around the motor.
Heater burnout from overvoltage
The cartridge heater runs well at 12 V, but I burnt one out by running it at 24 V while trying to heat faster. That was a straightforward failure, but it clarified the direction for the next iteration. Instead of overdriving a heater, it makes more sense to increase heating capacity using correctly rated elements, for example, adding a second 12 V heater so total power increases without stressing components.
Material and temperature limits
The shroud is 3D printed, and the current material choice is good enough for water-range testing and proof-of-function, but it has obvious limits at higher temperatures or with harsher chemicals. For this build, the focus was on getting the mechanics and control behaviour working cleanly. The next iteration would shift the wetted materials and sealing strategy toward something more durable, without changing the core layout.
Visibility inside the vessel
Using a flask is convenient and helps keep temperature behaviour stable, but it limits visibility of what is happening in the bulk fluid during certain tests. A clear vessel designed for observation would make mixing behaviour easier to study, especially when using colour tracing or when checking for dead zones and vortex formation. A jacket or external coil would also allow heating or cooling without blocking visibility.


Where it works?
This platform maps directly onto the kinds of operations that show up in real process work, even if the scale is small. It can be used to demonstrate timed batch routines, semi-batch additions, basic continuous flow concepts, and how temperature and mixing interact over time. The ability to run a sequence automatically is useful for repeatability, especially when testing the same routine across different fluids, different mixing speeds, or different temperature setpoints.
For demonstrations, food colouring tests are a simple way to visualise mixing, residence behaviour, and how fast the system reaches uniformity. From there, the same hardware can be adapted for small process experiments where controlled agitation, timed dosing, and temperature holding matter.
What Was Learned
This build reinforced that repeatability is often the real engineering challenge. Small details like sealing quality, trapped air volume, and how pressure changes during pumping can shape behaviour just as much as the electronics or the code. It also made temperature control feel real, because even basic on-off control becomes meaningful once you can log what the system does and tune the tolerance band. It also reminded me that iteration is fastest when the system is easy to disassemble and modify. Being able to reprint a shroud, swap a heater, reroute tubing, and adjust control logic quickly is what made the project move forward.

_JPG.jpg)